Proxy
Project Overview
The Proxy Interface is a Next.js-based web application designed to manage proxy channels in a healthcare interoperability testing environment. It provides administrators and users with an intuitive interface for creating, configuring, and managing proxy channels that facilitate communication between different healthcare systems and standards.
The proxy is used to capture TCP/IP packets exchanged by test participants using secured or unsecured channels. The messages exchanged between two systems are stored in a database for further analysis by protocol-specific analyzers.
The standards available are:
- HTTP - Web services and REST API communications
- DICOM - Medical imaging protocols
- HL7V2 - Healthcare messaging standards
- SYSLOG - System logging protocols
- RAW_TCP - Generic TCP/IP traffic
The proxy interface is accessible at https://gazelle.ihe.net/gazelle/admin/channels for local development, or through the configured production URL. Access is restricted to authorized Gazelle administrators.
Table of Contents
- Usage
- Getting Started
- Dashboard Overview
- Creating Channels
- Managing Channels
- Channel Configuration
- WebService API
Usage
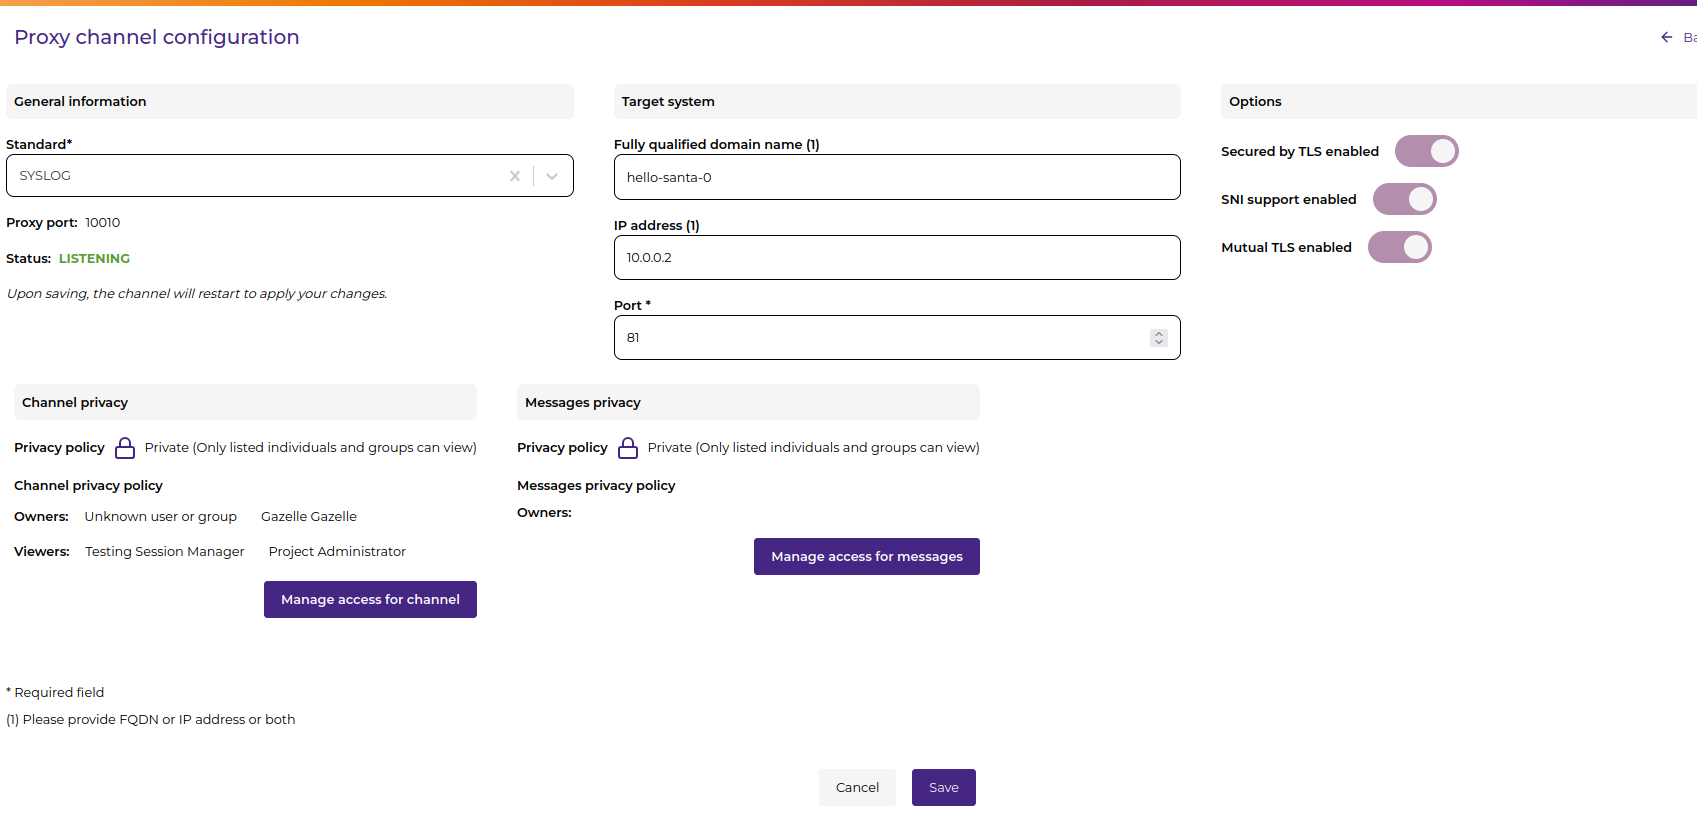
The web interface allows authorized users to create and manage proxy channels. A channel opens a port on the server hosting the proxy and redirects all traffic to a configured target server on a specific port.
The port is used by the responder SUT (System Under Test) to send messages to the proxy. The proxy then captures all messages sent on this port for analysis and validation.
At creation, channels can be configured with:
- Target system details (hostname/IP and port)
- Security settings (TLS encryption, SNI support)
- Specific-attribute options
- Privacy and logging preferences
- Auto-start capabilities
Getting Started
Accessing the Application
- Authentication: Navigate to the Gazelle Admin Interface
- Development URL:
https://gazelle.ihe.net/gazelle/admin/channels - Production URL: As configured by your administrator
- You’ll be redirected to Keycloak for authentication
- Enter your credentials and click “Sign In”
- Development URL:
- First Time Setup:
- If you don’t have an account, contact your administrator
- Registration URL:
https://gazelle.ihe.net/gum-ui/registration - Access requires appropriate user roles and permissions
Dashboard Overview
Channel List View
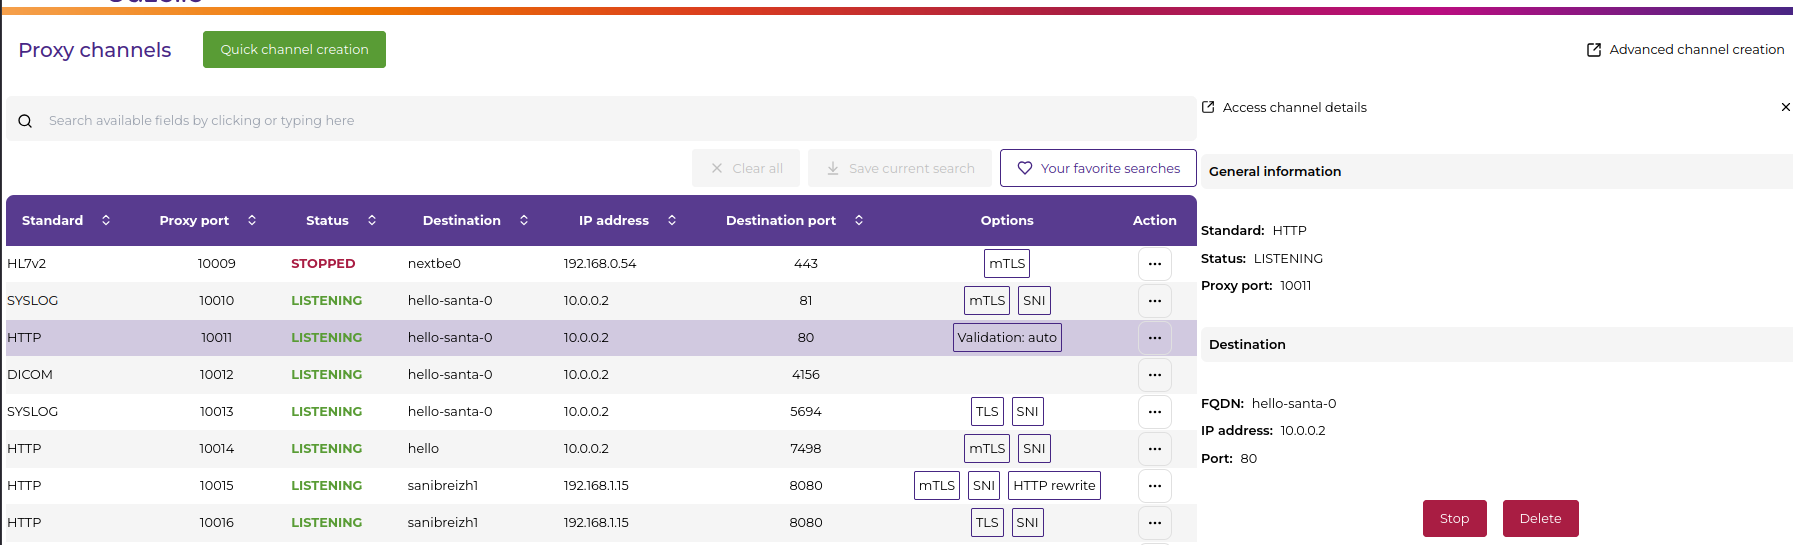
The main dashboard displays all proxy channels in a comprehensive table format:
| Column | Description | Details |
|---|---|---|
| Type | Channel standard | DICOM, HTTP, HL7V2, SYSLOG, RAW_TCP |
| Proxy Port | Local proxy port | Automatically assigned |
| Target | Destination system | Hostname/IP and port combination |
| Status | Channel state | Running (green), Stopped (red) |
| Security | TLS configuration | Secured (🔒), Unsecured (🔓), SNI enabled |
| Actions | Available operations | Start, Stop, Edit, Delete, View Details, View Messages |
Channel Status Indicators
- 🟢 LISTENING: Channel is active and can process messages
- 🔴 STOPPED: Channel is inactive but created
Channel Options
- TLS: Indicates if the channel is secured and uses TLS encryption
- SNI: Indicates if Server Name Indication is enabled for the channel
- mTLS: Indicates if mutual TLS is enabled for the channel
- HTTP Automated Validation: Indicates if HTTP message validation is enabled
- HTTP REWRITE: Indicates if HTTP message rewriting is enabled
Dashboard Features
- Real-time Updates: Automatic refresh of channel status
- Search and Filter: Find channels by type, status, or target
- Quick Actions: One-click start/stop for immediate control
Creating Channels
Quick Channel Creation
For quick setup of basic channels:
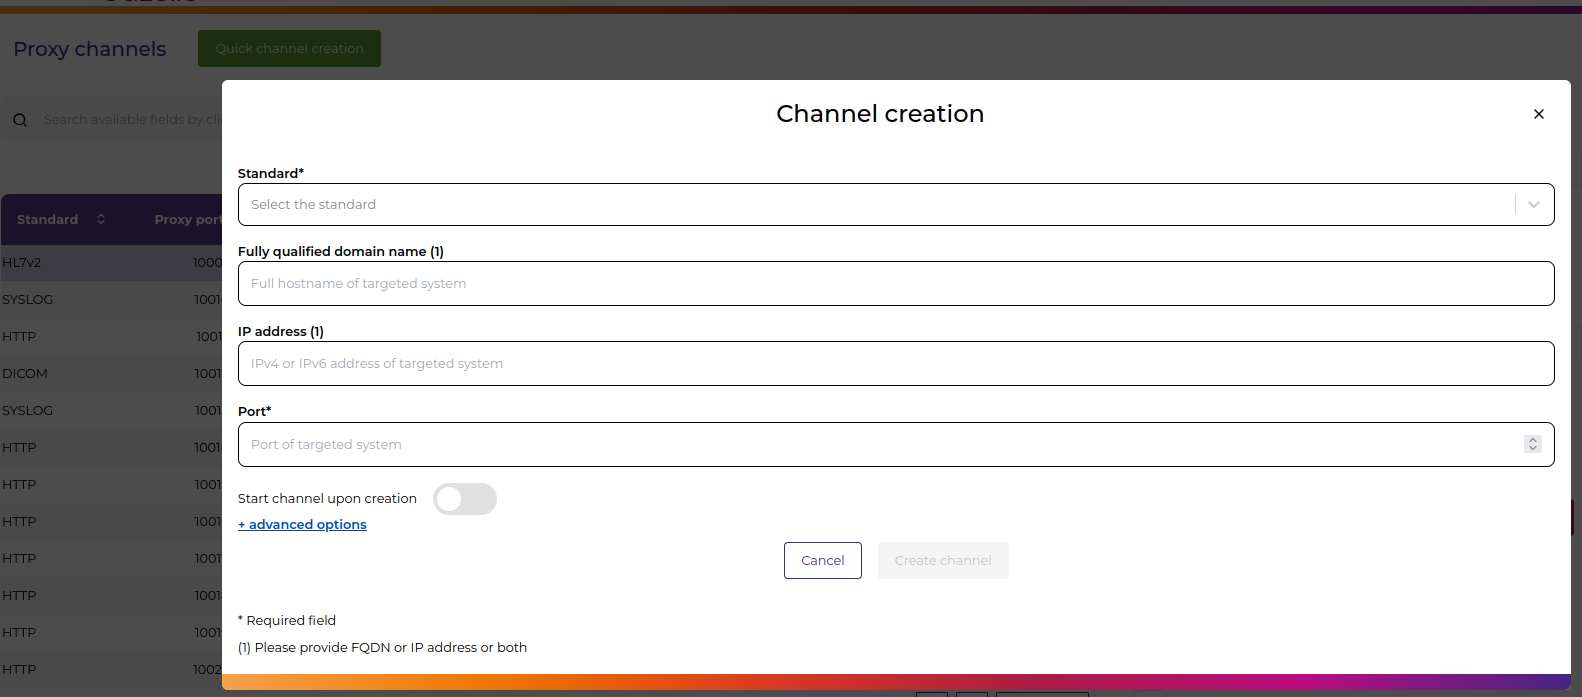
- Access Creation Form:
- Click the “Create Channel” button on the dashboard
- This opens the streamlined creation form
- All required fields are clearly marked with asterisks (*)
- Fill Basic Information:
Standard*: Select protocol from dropdown (DICOM, HTTP, HL7V2, etc.) Responder Hostname: Target server domain name (e.g., example.com) Responder IP: Target server IP address (e.g., 192.168.1.100) Responder Port*: Target server port number (1-65535) Start upon creation: Toggle to automatically start the channel - Validation and Submission:
- Form validates inputs in real-time
- Port availability is checked automatically
- Click “Create” for immediate creation with basic settings
- Or click “+ advanced options” to access full configuration
Advanced Channel Creation
For complete control over all channel settings:
- Access Advanced Configuration:
- From basic form, click “+ advanced options” link
- Or navigate directly to
/channels/create - Previous form values are automatically transferred via URL parameters
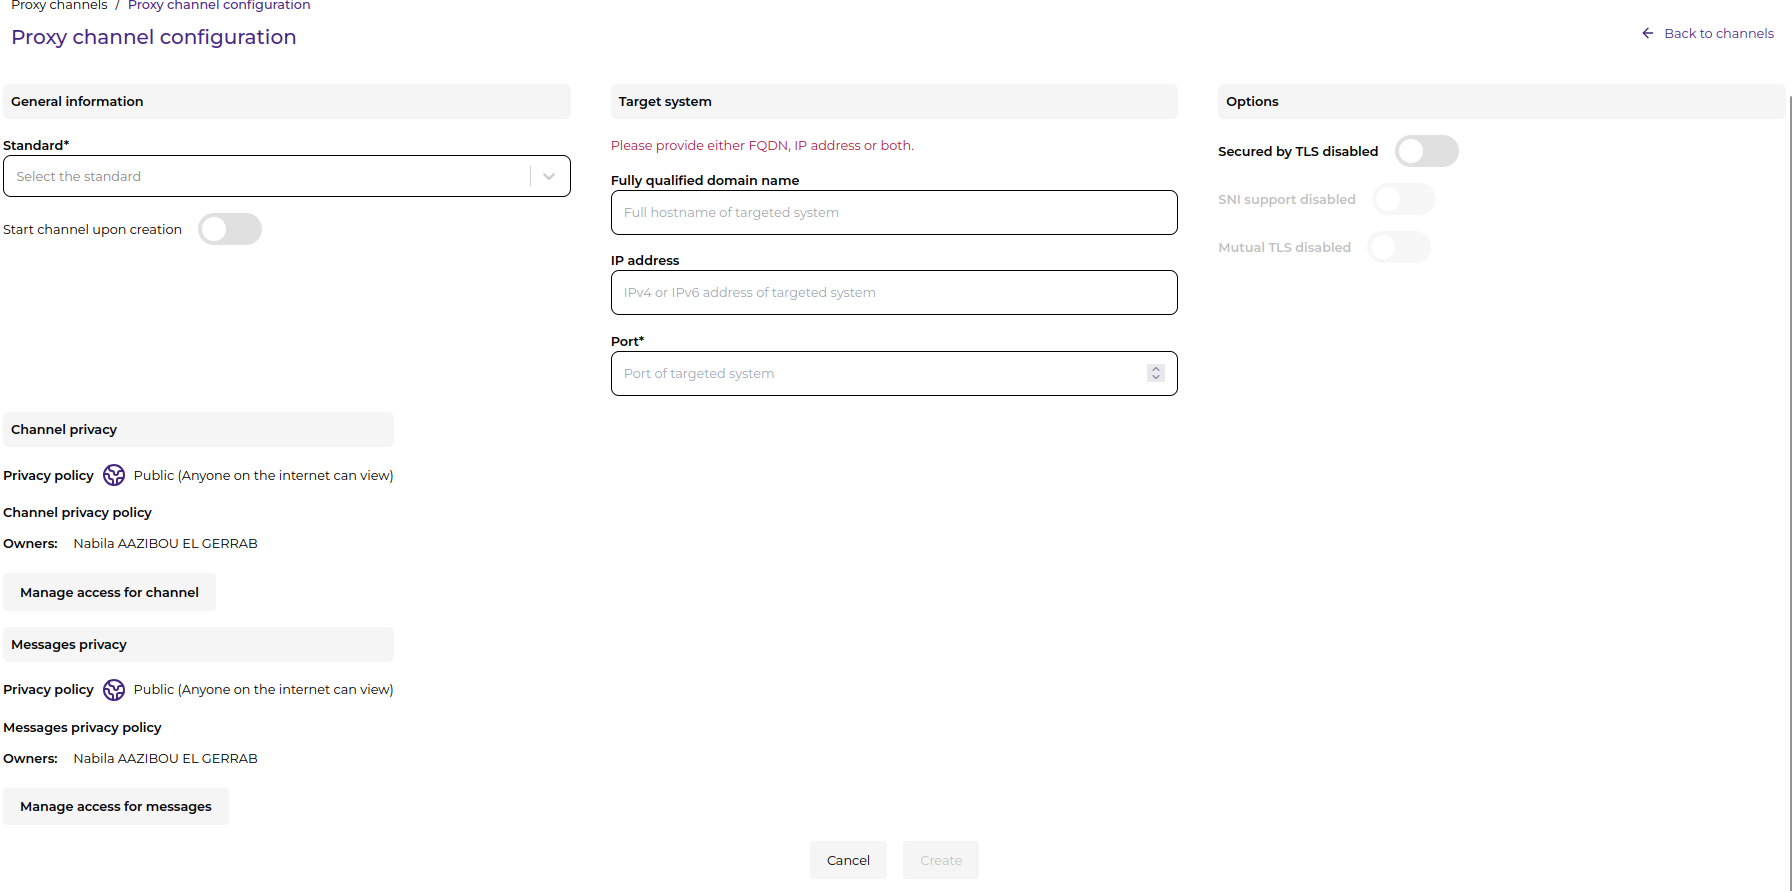
-
Complete Configuration Sections:
Security and Encryption
- Secured by TLS: Enable/disable encryption for secure communication
- SNI Support: Server Name Indication (requires TLS enabled)
- MTLS: Enable mutual TLS for client authentication
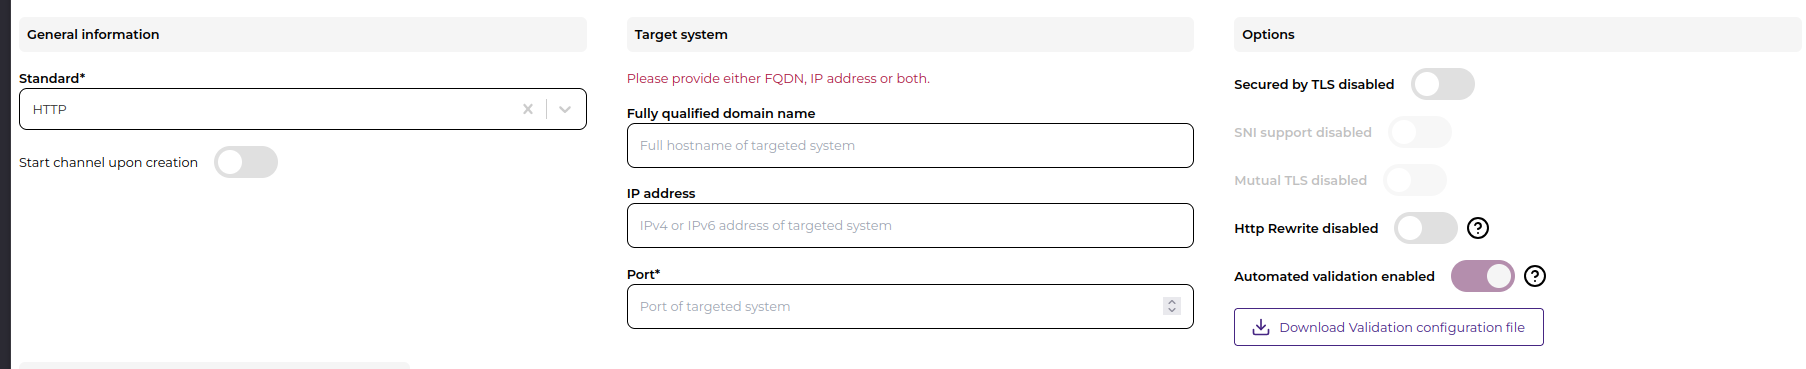
Specific attribute Options
- HTTP Channels:
- Automated validation: Enable/disable HTTP message validation, once enabled, the user can download the validation configuration file
- HTTP Rewrite: Enable/disable HTTP rewrite header
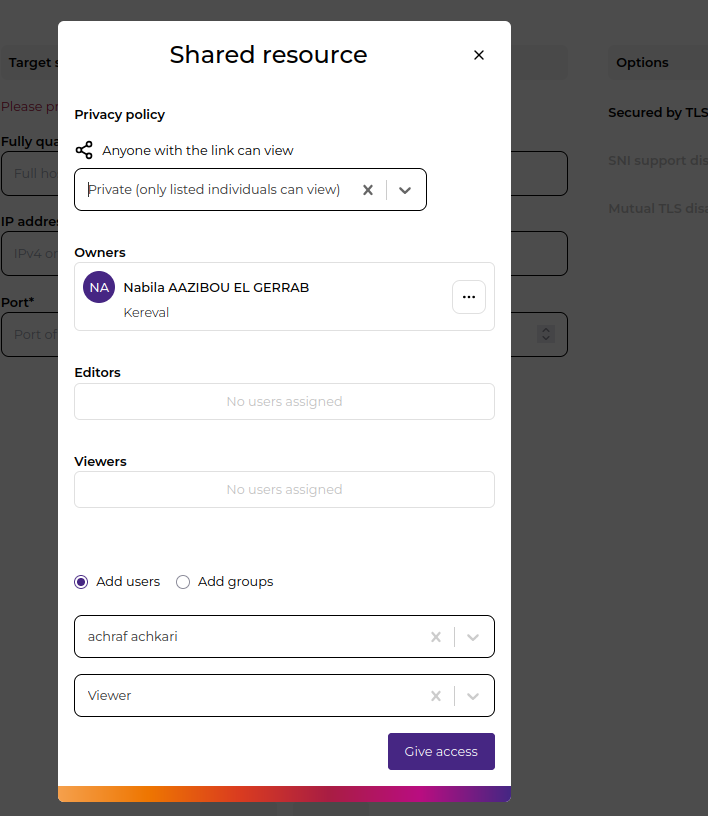
Privacy policy
Each proxy channel in Gazelle Proxy Admin Interface includes two distinct privacy scopes:
- Channel Privacy: Governs access to the channel’s configuration and controls (start, stop, edit, delete).
- Message Privacy: Governs access to the messages captured by the channel during operation.
Both scopes support the same privacy levels and role-based access control.
Privacy levels
- Public: Anyone on the internet can access the resource without authentication.
- Gazelle users: Access is restricted to authenticated users with a valid Gazelle account.
- Private: Only specific users or groups explicitly granted access can view or manage the resource.
Roles
- Owner: Full administrative rights, including visibility and permission management.
- Editor (channel only): Can modify the configuration of the channel.
- Viewer: Read-only access to the channel or message data.
Managing access
Access rights are configured through the Shared resource dialog available in the interface. Owners can:
- Select the privacy level
- Add or remove users and groups
- Assign appropriate roles (Editor, Owner or Viewer for channels)
Managing Channels
Each channel supports these operations:
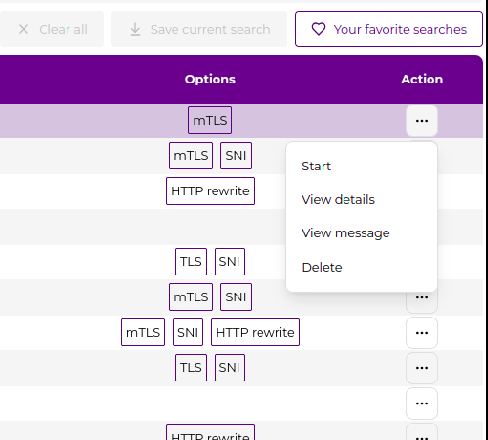
View Details
- When to use: Modify or view channel configuration
- How: Click the “Access details” button
- Available changes:
- Target system details
- Security settings
- Protocol options
- Privacy settings
Delete Channel
- When to use: Permanently remove a channel
- How: Click the “Delete” button
- Confirmation: Confirmation dialog appears
Start/Stop Channel
- When to use: Activate or deactivate a channel
- How: Click the “Start” or “Stop” button
- Status Change: Button color indicates current state
- Running: Green button for active channels
- Stopped: Red button for inactive channels
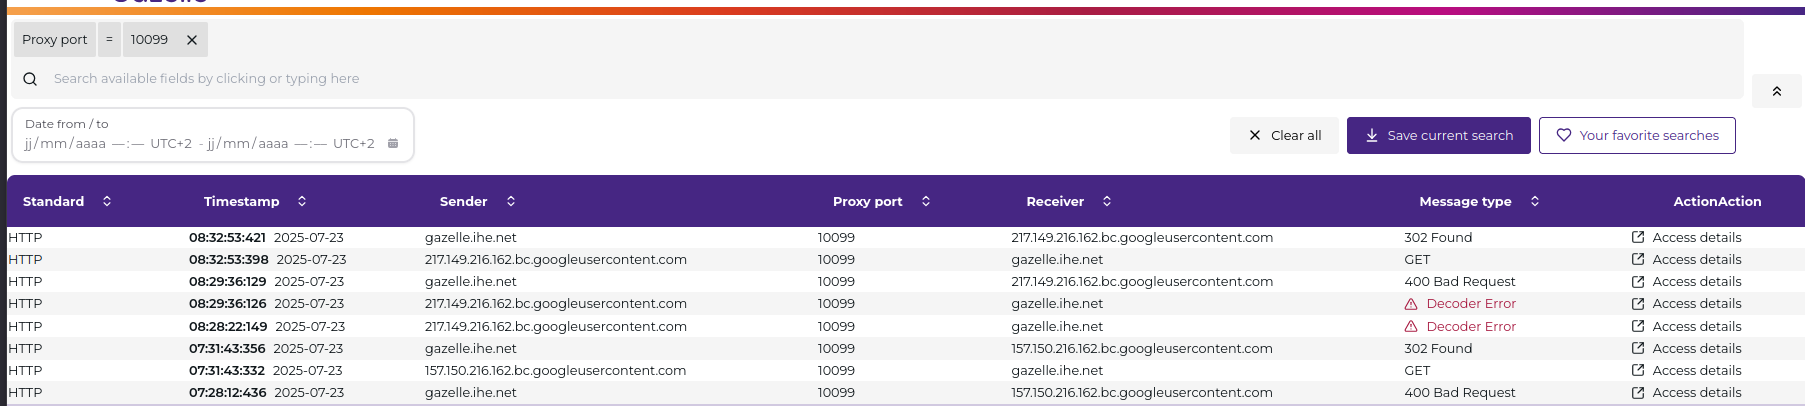
View Messages
- When to use: Inspect messages captured by the channel
- How: Click the “View messages” button
- Available actions:
- Filter messages by type, timestamp, or content
- Download messages in various formats (e.g., JSON, XML)
- View message details in a dedicated viewer
Proxy Configuration
Administrators can define the system-wide security defaults from the Proxy Configuration page. These defaults are applied to newly created channels.
Port Assignment
- Range of ports for auto-assignment: The proxy will assign ports within this range for new channels when “creation channel”.
- Range of port is defined by the devops team and can be modified in the configuration file.
Default TLS Configuration
TLS Protocols
The following TLS versions can be enabled or disabled:
- TLSv1.0: Disabled
- TLSv1.1: Disabled
- TLSv1.2: Enabled
- TLSv1.3: Enabled
Only TLSv1.2 and TLSv1.3 are recommended for secure communication.
Cipher Suites
Administrators can enable or disable specific cipher suites per protocol version. Some cipher suites available by default include:

Insecure or legacy cipher suites can be disabled to comply with organizational security requirements.
Proxy Certificates
Keystore (Private Keys)
This section contains certificates used by the proxy for TLS termination.
| Field | Description |
|---|---|
| Subject | Certificate Common Name (e.g., CN=qualif2.ihe.kereval.cloud) |
| Serial Number | Unique identifier for the certificate |
| Issuer | Certificate Authority |
| Validity | Start and end dates for the certificate |
Actions include:
- Enable / Disable: Toggle certificate usage
- View Chain: Inspect full certificate path
- Download Chain / Key
- Delete
New certificates can be added using the “Upload private key and certificate” option.

Truststore (Public Certificates)
This list contains CA certificates used to validate server certificates presented by target systems during mutual TLS.
Each entry includes:
- Subject and issuer
- Serial number
- Validity period
Actions include:
- Enable / Disable: Toggle trust status
- Download certificate
- Delete
To trust a new system, upload its public certificate in PEM format using the “Upload public certificate to trust (PEM)” button.

WebService API
The Proxy exposes a RESTful API for managing of proxy channels and certificate stores. The API documentation is available via Swagger: https://gazelle.ihe.net/proxy/swagger-ui/